Guitar Power Chords - Rock On !
If you want to sound really cool playing the guitar then using guitar power chords is what you need to learn. Using these chords in this method I will teach you only requires 2 fingers. These are very simple to learn guitar chords for even the beginner guitarist.
In case you are asking yourself what power chords are here is the scoop. These guitar chords are mainly used in playing rock music but you can use them playing any type of music.
Before we begin showing you some examples of these easy to use chords let me explain how you should play them. Since you will only be using the 6th and 5th strings which are your two low strings, or bass strings, you should only strum down on the strings.
Strumming up and down will not sound very good and they are used to only strum down on, this is why we say that they are mainly used when playing rock and roll songs. Most beginner guitar players want to learn rock any way so these are great chords to learn.
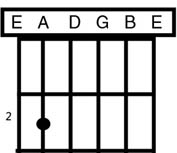
Ok let’s begin. The first picture here is the E chord and if you are familiar with making the major E chord this principle is based on the E chord. All you do here is place your second or third finger on the second fret and on the 5th string.
You are using two notes still because the E note is the open 6th string, so you will strum down on the 6th and 5th string to make the E power chord as shown below in the image. Now feel free to copy this page or save each image so you can have them for practicing later.

One thing that I think it is important for you to know about these chords is that they are moveable chords, meaning; that you use the same finger pattern while moving to different parts of the guitar neck.
Moveable chords are convenient and easy to use because you do not have to try and rearrange your finger position to make other chords. Even though guitar power chords are not the only way to play, they sure do make playing a lot easier and fun for the beginner.
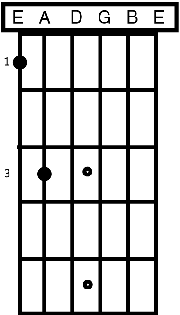
Let’s move to another chord example. Here we are going to look at the F chord – this is where you will actually use two fingers to make this power chord. Place your first or index finger on the 6th string on the first fret and then place your third finger on the 5th string 3 frets down from the first fret.

Now I want to point out something here about these movable guitar power chords. Looking at the F chord image; notice the fingering position. The top note is always your root note and this is going to be the fingering position that you will use down the neck of the guitar.
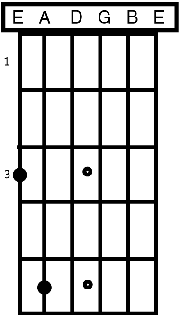
Here is one more chord example which is the G chord. All we do here is move the same fingering position to the third fret and this make a G power chord. Look at the image below.

We are not going to show you anymore examples this should be enough to give you the big picture of the finger pattern used to make these power chords. I will give you a picture of the fret board so that you can learn the root notes for using these chords.

Notice that I have only placed the notes for the 6th string only; this is the root notes that make up your chords. Remember I told you that the top string or the 6th string will be the root note for each chord, and you will place you third finger or 4th finger on the 5th string 3 frets down.
Until you can stretch your fingers you may find it easier to use your 4th finger on the 5th string. You will want to learn to free up that 4th finger later because there are other guitar power chords that uses 3 notes.
Now that you have the idea along with graphics to show you how to make these guitar power chords, it is up to you to practice them until you have become the maser of power chords.
3 note guitar power chords
Back to The Home Page
|


